A few years ago I wrote a popular blog post on how to host your own webcomic. I’ve had multiple requests to rewrite or update this article with more screenshots for creators. Here you go!
Free Lunches: There’s absolutely nothing wrong with hosting your comic under a free host if you don’t mind the ads or the slowness of the site, or the dangers that it’s really out of your control and one day you may wake up and the site might be down or your comics lost forever. It happens. It HAS happened. Be smart and always have your archive backed up locally! There are sites that will host your comic for free like comicgenesis.com, smackjeeves.com and others. If you’re JUST starting out today, you might even consider just using a Facebook Page or free Blogspot for your comic to build your audience up a little before taking the leap to self hosting.
But for those ready to take the next step and look a tad more professional and branch out on your own with full control, the following article is for you.
YES, it will cost you a little money… we’re talking 8.95 a month here. You probably spend more on coffee or fast food. If you’re a youngster, you could ask your parents to pay for hosting as an awesome birthday present as you build your burgeoning webcomics empire.
TOOLBOX
(things you will need) In no particular order, this is what we’ll be covering. Don’t freak out and go getting everything all at once, I’ll guide you through a new install of a comic and each topic below:
-An internet connection. (duh!)
– FTP Program: You won’t always need this, BUT you should have it on hand for manually moving files to your webhosting service and for better control on your account. I will reference FTP through this article. I use Cyberduck on a Mac (it’s free!) and when I was on PC you can use a variety of programs, but the FIRE FTP plugin for the Firefox browser is pretty awesome. Find it on Firefox by going to TOOLS/ ADD-ONS then search for it and install it. PS: you won’t always need an FTP program
URL / DOMAIN NAME: I suggest Godaddy.com for registering your domain names. Don’t use their hosting though, it’s a bit slow and clunky. For the purposes of this article I will take screenshots of my Godaddy account screens, etc.
HOSTING: There are TONS of hosting plans out there, with tons of different pricing models. Beware the uber cheap hosting of hosting attached to domain name services, it’s usually clunky and slow. I personally suggest DREAMHOST, mostly because it’s been what I’ve been using for years (since 2003) and my comics have survived traffic links from some of the big boys in comics like Penny Arcade, feuds with Scott Kurtz, and various other drama shitstorms of webcomics past. My sites also weathered incoming links from metafilter and slashdot, which can be site killers. It also has “one click” easy installs on things like WORDPRESS, FORUMS, and tons more. So, YAY for Dreamhost. The basic “unlimited” hosting plan will run you 7.95 a month, and they also offer a service strictly for WordPress hosting called DREAMPRESS, Click here to check em out.
WORDPRESS: This is my preferred CMS (content management system) I was actually the first person to use WordPress as a comic archiving system back in 2003 on the old Yirmumah site and colleagues said I was crazy that “blog” software wasn’t a good choice. I saw the great potential for things like tagging, categories and plugins. Nowadays it’s the norm for webcomic installs with great plugins like COMICPRESS you’re pretty much all set! Many hosting services have WordPress installs built in, just check with your host features. For the purpose of this tutorial, I’ll be showing you how I set it up through Dreamhost, but it should be similar on other hosts as well.
Step 1: Domain Name Setup
Head over to Godaddy.com or whatever registrar service you’re using and buy or setup your domain name. You’ll be changing the “DNS” records in just a little bit. This will basically point your domain name to your hosting account. All registration companies have a place where you can go in and edit your DNS records so be sure to scope out your account and get a feel for the domain settings and where things are. Sometimes reliable hosting (like Dreamhost) will also include reasonable domain registration fees. I believe they even come with the first one.
Step 2: Get Your Host On
As I’ve mentioned, there are TONS of hosting options and price ranges out there, but for the purpose of this tutorial I’m going to show you screenshots from my DREAMHOST account as I setup a whole new webcomic install. First thing first, you’ll want a host that allows WORDPRESS installs or has them built in. (Dreamhost does with easy one-click install)
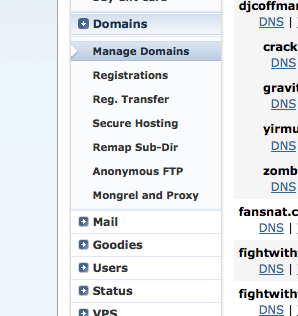 Inside or your hosting account you’ll usually have a “dashboard” or “web panel” that let’s you manage your services and add domains to host.
Look for “MANAGE DOMAINS” and then an “ADD DOMAINS” button on the next screen.
Enter the name of the domain. In this case I’m going to be setting up a whole new account for “kingofwebcomics.com” – Here’s a look at how my ADD DOMAIN screen looks and an example of what you’ll type in. Quick TIP: Notice I chose to have it remove the “www” when people type that in, this is much better for search engine results. (Click Screenshots to enlarge)
Also note I’ve chosen to use GMAIL and GoogleApps for this domain. Just follow those directions in “set your domain with Google” and you will be able to use a gmail account for e-mail addresses that have your account name. So in my case I could have something like “Elvis@kingofwebcomics.com” or whatever. It’s very handy to use. If you’re not familiar with GoogleApps you might want to research that too, but it’s not really important at this time. Basically it’s great for calendars, documents and organizing together as a creative team.
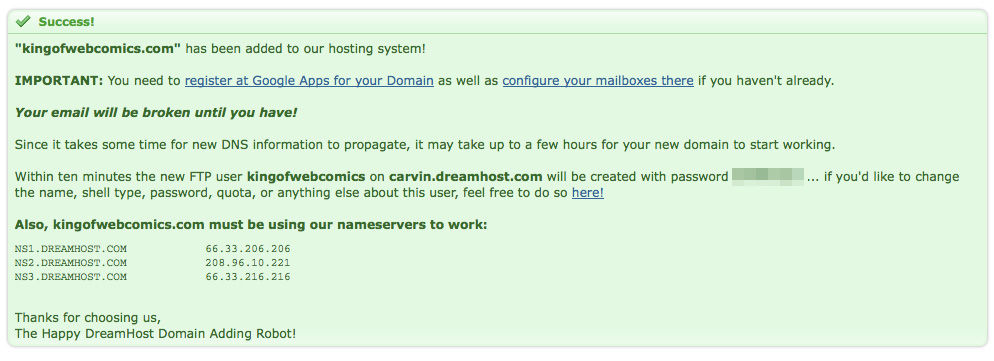
SUCCESS! Note the screenshot here. It gives you important info you’ll need like your “nameservers” – For dreamhost they are NS1.DREAMHOST.COM , NS2.DREAMHOST.COM, NS3.DREAMHOST.COM
Also note your FTP user/ password and info. It’s the username you setup in the first step and the password blurred out. You will need this to manually upload things to your site (possibly) This is the info you’d use with an FTP client like Cyberduck (on Mac) or FIRE FTP plugin for Firefox browser that I mentioned before. Not TOO important right now, just make note of this password and username so you don’t forget.
Step 3: Change your nameservers
You’ll want to head back over to your domain registration site and make sure you enter the nameservers that point to your new hosting account. Over on Godaddy.com it will be under DOMAIN MANAGMENT, then click on your domain listed to bring up the options for that particular domain name. You will now see a pretty bold NAMESERVERS and the option to “set nameservers”… click that!
 Once inside, you’ll simply enter those “nameservers” for your hosting company. You want to select the option that you have your own nameservers to enter. In may case it’s Dreamhost nameservers which are the NS1.DREAMHOST.COM, etc. When you’re done click OK. The screen looks like this…
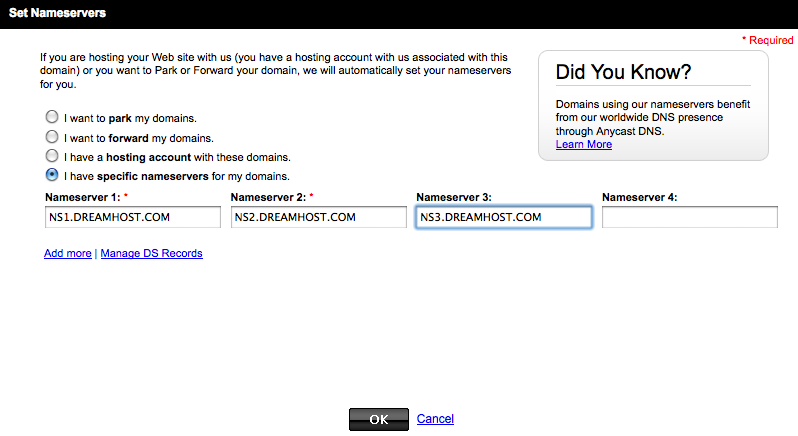 It will take a few minutes for all the things to point where they need to go. With Dreamhost + Godaddy, it’s usually pretty fast. By the time I’m done typing this part out, I should be able to see the hosting account on my FTP or the url pointing to a “coming soon” space at my host.
Congratulations! You’re now setup with your own hosting account… now let’s PUT SOME COMICS ON THAT SUMBICH!
Step 4: Install WordPress
Think of WordPress as the super powered engine that will be running your new comic underneath the hood. It’s an awesome content management system (CMS). Over on Dreamhost (and other hosts) they usually try to make it super easy to install. Here’s how I’d do an install on Dreamhost….
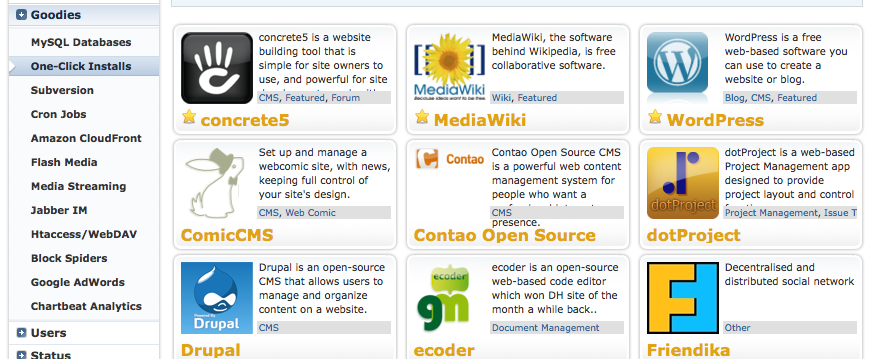
Look for the GOODIES TAB in my my sidebar and click it and then ONE CLICK INSTALLS…there are a lot of options besides WordPress that you could install, even one called ComicCMS which I’m not familiar with… click WORDPRESS…
Then you’ll get the pop up install. Choose SIMPLE INSTALL and then enter the URL where you want the WordPress installed. In my case I just entered kingofwebcomics.com as I want it to be the main CMS for my new site.
 In about 10 minutes or so, you’ll get an email from Dreamhost saying WordPress is installed and also give you a link to create a user admin account. Click that and this is what it’ll look like…
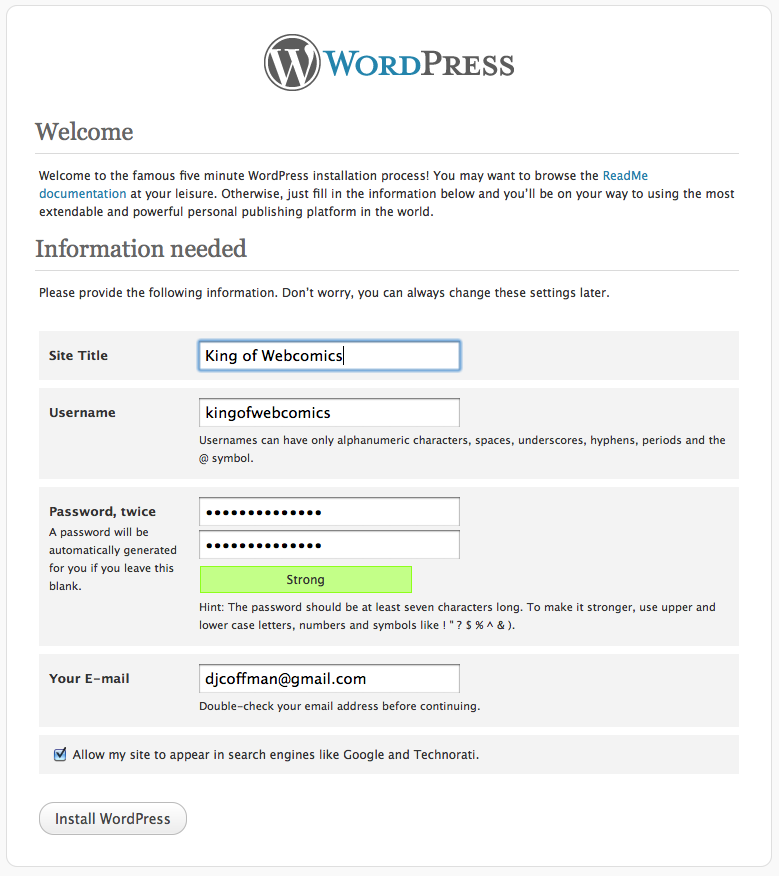 You’ll be able to change the Site Title and stuff later if you want, but be sure to enter and remember your USERNAME and password you chose there. Then it will ask you to login.
CONGRATULATIONS! You just installed WORDPRESS on your site! Kick the tires a little bit inside of your DASHBOARD area and have a look around. You’ll want to familiarize yourself with this CMS, just like you would with any engine you’d have in a car. Don’t be one of those guys or gals who doesn’t know how to check the oil or change a tire!
But wait… how do you put the comics on there??? Glad you asked…Â onto the next big step!
Step 5: Install the Comicpress Theme & Plugin
WordPress comes with TONS of themes that will change the look and functionality of your website. You can actually find TONS of premium and free themes out there, as well as folks who charge to customize your themes. But for now to get started in your quest to become the KING OF WEBCOMICS (or queen) let’s just install COMICPRESS, which has become the standard comic archiving system all over. Even some of the most popular webcomics run this… now it’s your turn.
Here’s a Screenshot and instructions for installing:
- In the left sidebar menus of your Dashboard select “APPEARANCE” and then “THEMES”.
- Select the “INSTALL THEMES” tab across the top of your screen.
- Use the search bar and type “comicpress”, hit SEARCH
- Hit the “INSTALL” button.
 You’ll want to hit the ACTIVATE button on the screen that pops up.
Now the fun begins!!!
Go to your APPEARANCE sidebar menu, and there will now be an option for “COMICPRESS OPTIONS” – Click that! You’ll get the following screen with a ton of options, see here:
You’ll want to explore all the tabs across the top of this page and select the options that fit the comic you want. There are ALL sorts of doo-dads and options. I’m not going to cover all the “how to’s” of COMICPRESS, but there is a great community of users at comicpress.net who are willing to help you out! As you’ll see in the screenshot they even have “child” themes available that are already tweeked out for color schemes, etc. – You can edit all of your CSS under APPEARANCE / EDITOR then go to the style.css and you can change color codes, text sizes, etc. (everything!)
HOLD YOUR HORSES AMIGO! Before you go slapping around with editing the look and feel, we need to setup a couple things in WordPress. You’ll want to go to POSTS/CATEGORIES and do the following:
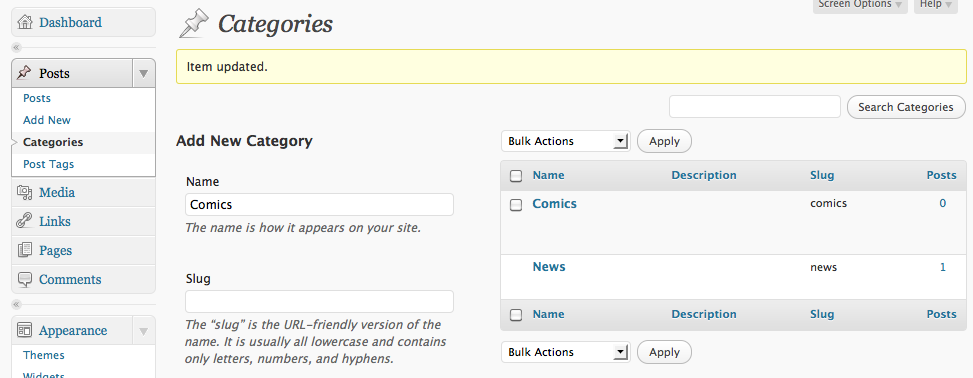 You’re going to want to ADD a new category called “Comics” and change the one called “uncategorized” to either “news” or “blog” – You can add other categories later on, but these will be your primary categories that tell Comicpress what post is a “blog” and what is a “comic”… that sounds reasonable enough.
Change your Permalinks!!:
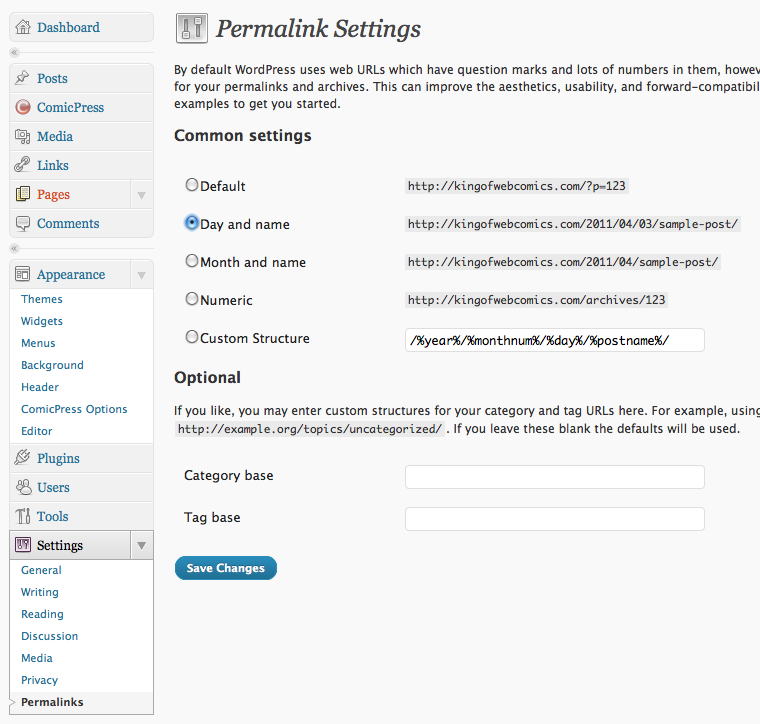 You’ll want to change your permalinks to get better SEO out of your site. I suggest “Day and name” or “Month and Name” or just a “name” structure. This will basically make it so your urls don’t look like this “kingofwebcomics.com
/?p=123" instead would be "kingofwebcomics.com/2011/04/results-may-vary (Search Engines love WORDS, not numbers)
INSTALLING COMICPRESS MANAGER PLUGIN:
Now you’ll need to install a “plugin” called COMICPRESS MANAGER, See screenshot:
- Go to PLUGINS menu, and select ADD NEW
- Search for “COMICPRESS MANAGER”
- Select “INSTALL NOW”
- Click on ACTIVATE on the next screen.
You will now have a special MENU item called COMICPRESS.
 Select that COMICPRESS in your menu, and go ahead and run the “YES, TRY AND MAKE MY COMIC DIRECTORIES” option.
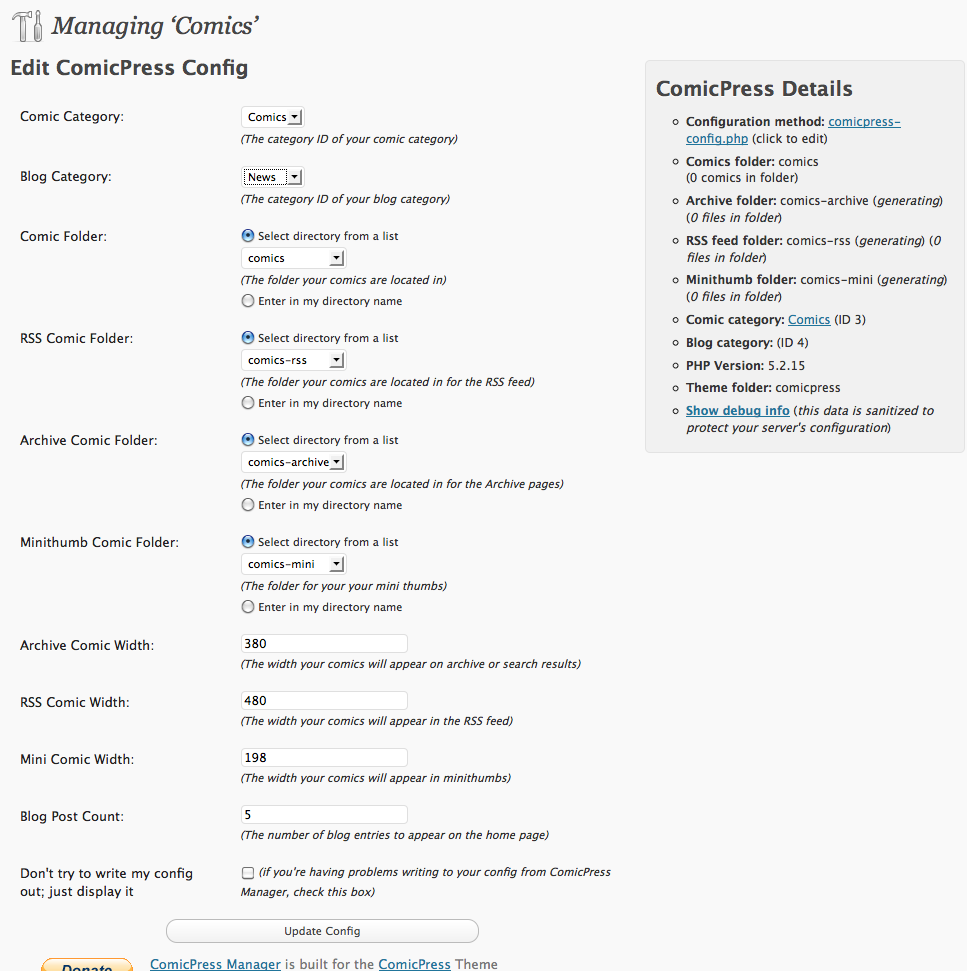
Now you’ll have the main options screen pop up that looks like this:
The most important thing here is to tell COMICPRESS what categories are for your comics and what are blog posts. In my case my Blogs are under my “NEWS” category that I added. Select accordingly and hit UPDATE CONFIG. This manager can also be used to bulk edit strips, handle storyline structures and all sorts of things. Kick it around, but for now those are the basics…
Step 5: Publish a comic!
Now you’re completely ready to publish your first comic on your site. Here are the simple steps:
- You will need to name your comic files like so “year-month-day-filetype” here’s an example:Â “2011-04-03.jpg” — You can also add titles after the “day” section so it could be “2011-04-03-results-may-vary.jpg”
- Select ADD NEW POST and select the category “COMICS” under the categories box menu on the right of your screen.
- Enter any description text you want for this comic in the main body.
- Enter subject “tags” in the POST TAGS section. This is really important for search engines. Tag your post accordingly. For instance I might tag this comic as “webcomic hosting, webcomic how to,” or combinations of keywords or topic people might search for on google.
- Hit PUBLISH (or schedule your posts for future dates.
BANG! Your first comic has been posted!
CLOSING NOTES
Those are the basics of hosting and publishing your own comic. Of course you’re going to want to tweek out your site visually with custom header images, etc. You can do most of all of that through you APPEARANCE menu. But don’t hesitate to ask other Comicpress users at Comicpress.net – I suggest you familiarize yourself with CSS just a LITTLE BIT. Go into “EDITOR” and just look around and see how things are written and get use to that. YOu can easily make changes to color numbers for titles, links, backgrounds, but before you do any of that I highly suggest making a backup text copy of all the CSS details. That way if you monkey around and break something, you can put it all back! Tweeking out your site can be a lot of fun.
PLUGINS: You’ll also want to utlilize the following PLUGINS and install them on your site through your PLUGINS menu:
- AKISMET: a great spam catching filter. You will need this to stay sane!
- SuperCache or WordPress Cache program: This will help the speed and loading times in your browser and also won’t kill your host’s CPU or fry their servers. Do yourself a favor and use this! Almost a must have, I’d say.
WIDGETS: One of the coolest things about COMICPRESS / WORDPRESS are the WIDGET options. You can put cool plugins like the image navigation bar under your comic, over the comic and in all sorts of different locations. This is how you add advertising to your headers, sidebars, twitter feed codes, whatever you want. Just click APPEARANCE then WIDGETS to see the different location options you have with this theme. You can look at other sites to get an idea of what they are putting in their sidebars.
In general, just keep your eyes peeled for new plugins and updates and ways to enhance your comic site as you go. Happy publishing!
________________


